Sunday, December 25, 2011

Wednesday, December 14, 2011

Insulating Your Garage Doors

Recently I decided it was high time to make my work space more workable (see post here).  Since winter is here and it's way too cold to work out in the garage/work shop, I decided insulating the garage doors was the first step.

So here are the steps to getting it done.

There are a couple of options when it comes to the type of insulation you can use.  We decided on the foam panels.  It gives a nice finished look once installed.  We weren't able to find these at our local home improvement stores but we did find them at a garage door specialty store and were able to buy them there.  They can also be ordered online.

Before you go to buy your insulation panels, you will need to know the height of your garage door panels.  They generally come in about four different heights (18", 21", 24", and 27").  This will allow you to determine the size panels you need.

Next, you need to know how many insulation panels you will need.  Most garage door widths are pretty standard.  We told our guy we needed enough to do (1) two-car garage door and (1) single car garage door.

Here are what the panels look like.


Now it's time to measure how wide your panels need to be.


On our garage door, the two end sections were different widths than the two middle sections.

Using your tape measure, measure off this width onto the insulation panels...


and use your straight edge and box knife to cut them.


It doesn't cut all the way through, so you can gently "snap back" the panel for a pretty clean break.


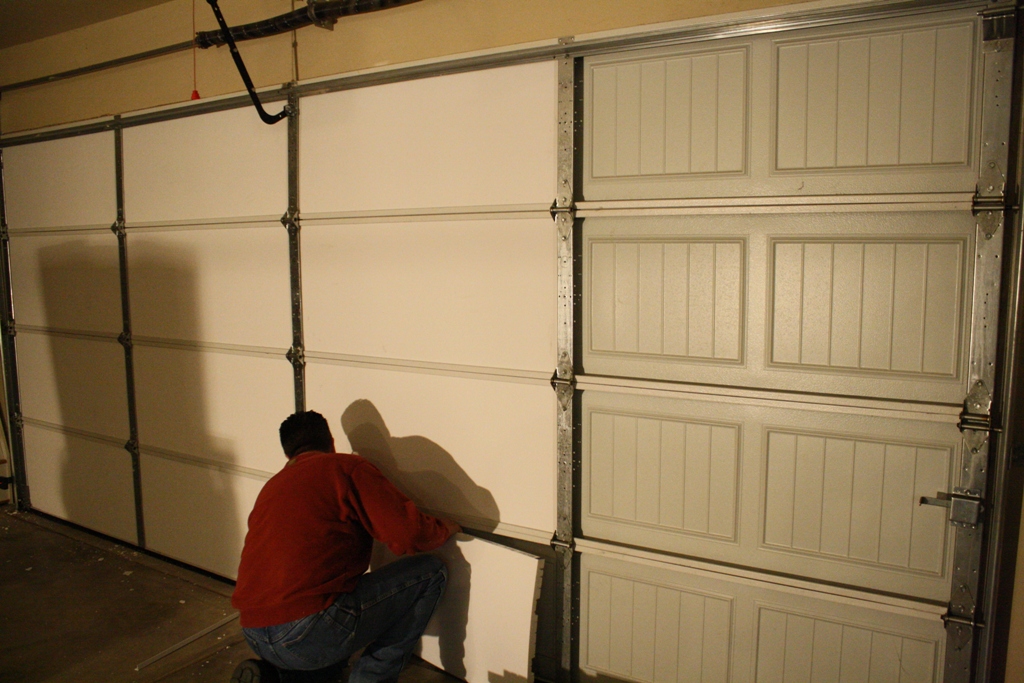
Now it's time to install.  Slip the bottom in the "notch" on the garage door panel and gently bend the insulation to pop it into place.


For a finished look, you can install these end pieces.  They install in a similar manner (these were pre-cut to the height of the panels)


And that's really all there is to it!  My husband did both doors in about 2 hours time and the cost was a little over $225.

We have noticed a definite difference in the temperature of the garage - about 10 degrees F warmer than the exterior.  And it's much quieter now (the stereo sounds better, too!).

It's not the most glamourous upgrade but it makes working in the garage in the winter much more bearable!

I Need a New Craft Studio!

One of the blogs I follow (The Ivy Cottage Blog) recently revealed her craft studio remodel.


I love it!  So I decided it was high time to redo my space our space (my husband does wood working in here, too).

Now, to call my space a "studio" is a stretch, to say the least.


Nauseating, isn't it?  I'm twitching just looking at it!

My hubby loves turning wood on the lathe (check out his Etsy shop here) and this used to be his work area. When all you're making is pens, bottle stoppers and duck calls, this was plenty of space.

But I do furniture. It takes a lot of room!  So currently, every time I work on something, I have to back out our vehicles (this is a three car garage) drag my projects to the middle of the garage, dig around to find the stuff I need and then put/stack everything back at the end of the day so we can fit both cars back into the garage.  Exhausting, isn't it?  And not conducive to creativity.

Plus, our garage faces the north and in the winter it gets COLD in there!  We decided the first step of the remodel should be insulating the garage doors.  See the post on how to do that here.

Here are some ideas I would like to incorporate into my remodel.


Our garage has no windows so the lighting is horrible!  I would like to replace the current solid door leading out to the back yard with something like this door.  A little natural light would be nice!


Love these floors!


I'm wanting to do black cabinets on the bottom and white cabinets on the top with a "latte" color wall. similar to this.


I love this work island!  I would need to put mine on locking castors so I could move it around easily.

Alas, all that has been done is the not-so-cosmetic/not-so-fun part of this remodel and it's the insulating of the garage doors.  (s-i-g-h)


(I told you the lighting was terrible!)

Monday, December 12, 2011

It's One of Those Weeks

Do you ever have times where it seems everything starts to fall apart all at once?


This is one of those weeks.

1)  Vacuum cleaner exploded after vacuuming only one room.  On the hunt for the perfect vacuum now.

2)  Spent two days trying to figure out how to wire two GFCI switches.  Not how I wanted to spend two days and $30+.  In the meantime, no bathroom lights...they were connected to the GFCI switch.  The upside is I could wire one in my sleep now!

3)  Replace the "guts" to the door knob on the door going out into the garage.  By the way, Weiser (my door knob manufacturer) has been bought out and is no longer in business.  You can probably figure out how I found this out.

4)  An old mirror turned chalkboard (from my Etsy shop) shipped via UPS to Connecticut and arrived in a million pieces!  Still dealing with this one.  I have a strong opinion of UPS right now!

5)  And I got up this morning and a light was out in the kitchen.  Normally not a big deal but after the week we've had around here...!  Much easier to fix than the GFCI switch.

Yet even after these hiccups, I'm still feeling blessed.

Have a wonderful day!

Friday, December 9, 2011

Ravioli Lasagna

Do you ever has those days when dinner time sneaks up on you and you're just not ready?  I've had a lot of those days lately!

When that happens, a quick and easy meal is always in order.  Spinach & Pesto Ravioli Lasagna was our go-to recipe last night.

This is my adaptation of a recipe found on myrecipes.com.

Photo: Southern Living

Ingredient List

1 (16 oz) package frozen chopped or cut leaf spinach

3/4 cup basil pesto

2 (15oz) jars Alfredo sauce

1/2 cup chicken broth

2 (25 oz) packages frozen cheese ravioli

2 cups shredded Italian cheese blend

Preheat the oven to 375F.  Combine frozen spinach and pesto in a medium bowl.

Combine Alfredo sauce and chicken broth.  Spoon 1/3 of the Alfredo sauce mix (about 1 cup) into the bottom of a lightly greased casserole.  I use a large 4 Liter Corningware roaster.  Top with half of the spinach and pesto mixture.  Spread one bag of the frozen ravioli over the spinach mixture.  Repeat layers once.  Top with the remaining Alfredo sauce.

Bake, uncovered, at 375F for about 45 minutes.  Remove from the oven and sprinkle with shredded cheese.  Bake another 5 to 10 minutes or until hot and bubbly.

You don't have to thaw the spinach or the ravioli before baking but make sure the center of the lasagna is hot before serving.  Try sliding a knife down the middle of the dish and pull it back out.  If the knife is not hot, the dish is still cold in the middle.  If that's the case pop it back in the oven for a little longer.  Cover if it begins to get too brown.

Add a salad and some garlic bread and dinner is on!  You can easily cut this recipe in half and still have delicious results.

Monday, December 5, 2011

Must Haves At My House

Recently, I have been pondering what are my favorite things that I just couldn't be without?  So here is what I have come up with.

First off, I love Clorox wipes.  I keep a container of these in each bathroom for a quick wipe down a couple times a week.  And for sure a container under the kitchen sink!


Next up would be a tube of my favorite adhesive...E6000.  There is nothing that this stuff won't work on!  A must have for any self respecting crafter.


I love this spray paint!  It has an easy to use nozzle and goes on evenly with a nice spray pattern.  The coverage is good, too.  And it's priced cheaper than the other name brand spray paints.  The only down side is the limited color selection.  I love the gloss black.


I know this probably isn't very green but I love bleach!  I use it in my sinks, the shower, the laundry and I mop the floors with it.  Plus, the smell of bleach makes me feel like the house is clean.


A great cleaning product that cleans more than just your wood is the Swiffer Dust & Shine.  I use this to clean my furniture, leather sofa, stainless steel fridge and granite countertops.  Love it!


So, that's a few of the things that my house is never without!

Tuesday, November 29, 2011

My Favorite Silver Polish

Christmas is approaching so we have been busy around our house getting ready for the big day.  My Hubby is in charge of the outside and I head up what goes on inside.  This not only includes decorating but also cleaning to get ready for family and friends.

One thing that needed done was some silver polishing.  Here is a before pic.

As you can see, it was long overdue for a polish.


Here is what I love to use.


It so easy to use and there is no smell.  Just dampen the sponge that is included, add some silver cream and start rubbing (no elbow grease required)!  Then rinse with water and dry.  That's it!

Here are the results.


In addition to cleaning and polishing your silver, it also works on stainless steel, flatware, chrome, porcelain, fiberglass and pewter.  The web site says it's great for shining motorcycle and automobile chrome and it even claims to remove surface scratches from CDs and DVDs!

Here in Oklahoma you can find it at Ace Hardware, True Value and Wal-Mart.

It's a must have for getting ready for company!